ISO in Nature Photography
ISO (or ASA) is part of the exposure triangle and was used to described the speed of film in film days. With digital photography it means how sensitive the camera sensor (instead of film) is to light.

The lower the ISO (100 or 200) the finer the grain (less digital noise) with more detail in your photographs but you do need more light as it is less sensitive to light.
In film days these were the Fuji Velvia 50 ASA and Fuji Provia 100 ASA films.
The Devil's Claw seed was photographed at the lowest sensitivity of ISO-100 and you will see fine detail and a smooth texture...

The higher the setting (1600 - 12 800 and above) the coarser the grain (more digital noise) with less detail in your photograph and the less light you need as it is more sensitive to light.
In film days these were the 400, 800 and 1600 ASA films.
The star trail below was photographed from Olifants Camp in the Kruger Park with no noise reduction and is grainy with a course texture...

Please keep in mind that each camera may have different minimum and maximum settings - some camera bodies minimum setting is 50 while on others it is 200. The same goes for the higher settings and just because a camera goes higher doesn't mean you should automatically use the higher settings - first check the noise at these high settings and then decide.
In film days once we have loaded a spool we were stuck with that spool and ISO/ASA speed. So if we were in Etosha and were shooting during the day we would be using 50 or 100 ASA film, no problem. But if the weather changed or if we got back to camp and wanted to shoot animals at night at the waterhole we would need a faster speed film.
Here we would have to rewind the 50 or 100 film in the camera and then insert 400 or 800 ASA film or we would 'push' the film - that simply means inserting a 100 ASA film but shooting at 800 ASA.
We would then need to mark the spool with a marker pen that it had been pushed so that when we took it in to be developed it would be developed at the correct speed otherwise it would be under or over exposed, depending on whether we had pushed or pulled the film
A few times we forgot to mark the spools and our films came back under exposed - thank God for digital cameras where we can set different ISOs effortlessly!
So how do you know when to use what ISO?
• If you are shooting on a bright sunny day use a low-ISO as there is plenty light.
• The more magnification you get from your lens the higher you should be setting your sensitivity - under the same conditions a 600mm lens with 1.7X teleconverter needs a higher-ISO than a 200mm lens.
• If it is overcast or cloudy use a higher setting.
• If you are shooting action that you want to freeze you will need a higher setting
• If you are shooting star-trails or want motion blur use a low-ISO.
• If you are shooting landscapes where you are using a tripod use a low-ISO
• If you are shooting macros where you are using a tripod and flash use a low-ISO.
• For nocturnal photography use a high-ISO especially if the subject is further away and your spotlight is not very bright.
• If you do not want to and are not allowed to use flash in low-light conditions then you would use a high-ISO
• If you do not have a tripod under low light conditions then you would use a high-ISO when hand-holding your camera.
Low-ISO provides sharper results with more detail but rather get a grainy photograph than a blurred photograph - you can always fix the grain with Noise Ninja or other software programs but you cannot un-blur a photograph!
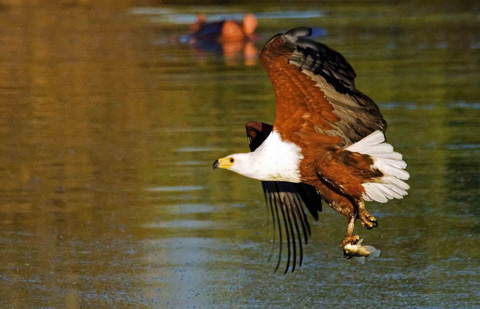
The fisheagle below was photographed at 3200-ISO and is quite noisy...

In the next three photographs the same image has been processed using Noise Ninja, Noiseware and Topaz to remove the noise.


Noise is NOT the end of the world!
Return from ISO to Safari Photo Tips page

 Subscribe To This Site


To make a safari rental booking in South Africa, Botswana or Namibia click here

"It's 764 pages of the most amazing information. It consists of, well, everything really. Photography info...area info...hidden roads..special places....what they have seen almost road by road. Where to stay just outside the Park...camp information. It takes quite a lot to impress me but I really feel that this book, which was 7 years in the making, is exceptional." - Janey Coetzee, South Africa

"Your time and money are valuable and the information in this Etosha eBook will help you save both."
-Don Stilton, Florida, USA
"As a photographer and someone who has visited and taken photographs in the Pilanesberg National Park, I can safely say that with the knowledge gained from this eBook, your experiences and photographs will be much more memorable."
-Alastair Stewart, BC, Canada
"This eBook will be extremely useful for a wide spectrum of photography enthusiasts, from beginners to even professional photographers."
- Tobie Oosthuizen, Pretoria, South Africa
Photo Safaris on a Private Vehicle - just You, the guide & the animals!