Working with Light in Nature Photography
Just like a painter uses paint to create a painting a photographer works with light to create a photograph. The word 'photography' actually means drawing with light: 'photo' = light and 'graphy' = write or draw.
Working with light is therefore the primary factor in making impressive images and we need to know a bit more about it such as where it comes from and what different types we will be faced with.
As nature photographers we are outdoors and our daylight source is the sun.
Daylight from the sun appears to be white or have no color but sunlight is actually composed of a range of different colors and a refraction prism shows the full spectrum of colors.
White objects reflect most of the sunlight's wavelengths that strike them and that's why a white bird or flower photographed in bright sun tends to lack detail. A dark subject like a buffalo absorbs all the colors and none are reflected, hence we see black.
A mid-tone subject such as a green leaf reflects the green wavelengths that create the visual effect of green while the other colors in the sunlight are absorbed by the leaf.
The color of sunlight can vary and is dependent on a number of factors such as the time of day - early mornings and late afternoons the sunlight is more yellow because the sunlight travels through more of earth's atmosphere and the longer path results in more blue light being absorbed than red (shorter wavelengths of light are absorbed more easily) or the amount of heat haze or dust in the air - this will filter the sunlight
A camera's sensor is designed to produce colors that match those in the original scene, but you do get variation among sensors, circuits and software that process the raw images and your results will be dependent on your exposure accuracy and the match between sensor color balance and the sunlight illuminating the subject.
Exposure has been discussed under the exposure triangle so you then need to ensure your white balance (WB) is set correctly. The WB adjusts relative sensitivity of the sensor to different colors to match the overall color cast of the sunlight it’s recording - sunny, overcast, indoor etc.
If you set the WB incorrectly it's not a train smash as you can rectify this in Photoshop and a RAW file is easier to correct than a JPEG hence we shoot RAW.
As a Nature Photographer, you will be working with light under three different lighting situations...
1. Working with Light in the Early Mornings and Late Afternoons
This is when the sun is low in the sky thereby providing your photos with a warm glow and mild shadows bring out form, texture, and depth. The closer the sun is to the horizon the lower the contrast will be thereby allowing both shadows and highlights in your photographs to have good detail.
You will have three different sunlight directions depending on where you position yourself in relation to your subject...
• Side-lighting
increases the sense of texture and volume but works best only when the sun is very low. This limits side-lighting to just one hour after sunrise and the hour before sunset.
This leopard in the Kruger Park is lit by the sun from the left and makes a pleasing picture. If this was earlier in the day the shadows on the right of the leopard would have been very dark.

• Front-lighting
decreases visible shadows and minimizes surface details. The best time for front-lighting is about 3 hours after sunrise and 2-3 hours before sunset. In the winter months you will have more time for shooting as the sun is lower in the sky for longer than in summer. If you want to use front-lighting just after the sun has risen keep in mind that you and your vehicle's shadow will be long and may reach your subject so you may need to move a bit to the side until the sun is higher.
The light on this gemsbok in Etosha is perfect - no shadows and nice coloration...

• Backlighting
places the side of your subject facing the camera in the shade – you could add exposure, or use fill flash but we like to photograph silhouettes or get 'rim-lighting' where there is a halo of light around your subject. Here again you are limited to about an hour after sunrise and an hour before sunset. Please watch out for flare when shooting into the sun.

2. Working with Light at Midday
Top-lighting casts very dark shadows - you shouldn't be shooting at this time of the day as the lighting is the very worst for photography! Even the most impressive animal subjects will look dull and uninteresting when photographed in the midday sun.
This cheetah was photographed at about 13h00 on a sunny day in the Kruger Park - not an impressive photo is it? The light is totally flat and lacks vibrancy...

Although our eyes can see detail in both the bright and shadow areas at noon our camera sensors cannot capture this dynamic range of contrast adequately.
Overcast days are, however, a different story as the diffused, soft light on an hazy or overcast day softens colors and textures. Action photography may be difficult to capture but for portraits, static subjects or panning it is superb light. Here the best time to shoot is from about 09h00 until 15h00.
This lion was photographed in the Kgalagadi on an overcast day - the photograph isn't punchy like front-lighting would have made it but it doesn't have any harsh shadows either so makes an OK photograph...

3. Working with Light at Night
After the sun has set you can carry on photographing but you will need to use a combination of moon-light with long exposures, spotlights and/or flash.

So next time you are on a photo safari remember that simply by working with light and moving your position, or your vehicle's position, you can provide three totally different yet pleasing lighting effects with the same subject - front-lit for colorful, impactful photos, side-lit for detailed, three-dimensional photos and back-lit for dramatic silhouettes and/or rim-lighting.
And on overcast days you can sleep in and go shooting after 09h00!
Return from Working With Light to Safari Photo Tips

 Subscribe To This Site


To make a safari rental booking in South Africa, Botswana or Namibia click here

"It's 764 pages of the most amazing information. It consists of, well, everything really. Photography info...area info...hidden roads..special places....what they have seen almost road by road. Where to stay just outside the Park...camp information. It takes quite a lot to impress me but I really feel that this book, which was 7 years in the making, is exceptional." - Janey Coetzee, South Africa

"Your time and money are valuable and the information in this Etosha eBook will help you save both."
-Don Stilton, Florida, USA
"As a photographer and someone who has visited and taken photographs in the Pilanesberg National Park, I can safely say that with the knowledge gained from this eBook, your experiences and photographs will be much more memorable."
-Alastair Stewart, BC, Canada
"This eBook will be extremely useful for a wide spectrum of photography enthusiasts, from beginners to even professional photographers."
- Tobie Oosthuizen, Pretoria, South Africa
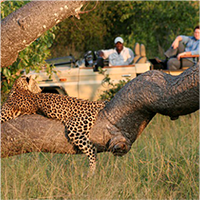
Photo Safaris on a Private Vehicle - just You, the guide & the animals!
New! Comments
Have your say about what you just read! Please leave us a comment in the box below.